Building a Form and Email Notification System with Directus and Next.js
Published August 3rd, 2023
Well-designed data collection and notification processes empower businesses to gather key information about their customers in an efficient and actionable manner.
In this tutorial, we will walk through how to use Directus as a composable data platform that stores form data and sends instant email notifications.
Here’s a quick overview of the system:
- Users complete a form in a Next.js app
- Directus stores the submitted information in a collection
- When a new submission is stored, an automated workflow is triggered in Directus to send an email notification to the business and a thank you email to the user
Prerequisites
To follow along with this tutorial, it is important to have the following:
- A Directus project, either self-hosted or a Cloud account.
- Basic knowledge of React.js and Next.js.
Setting up a Directus Collection for Data Storage
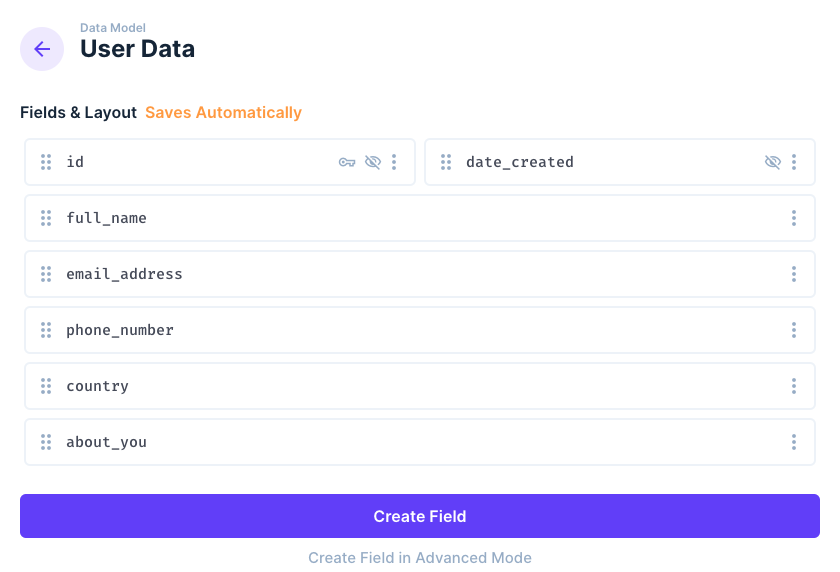
To begin, log in to your Directus app and navigate to Settings > Data Model
Click the + icon to create a new collection called “user_data”.
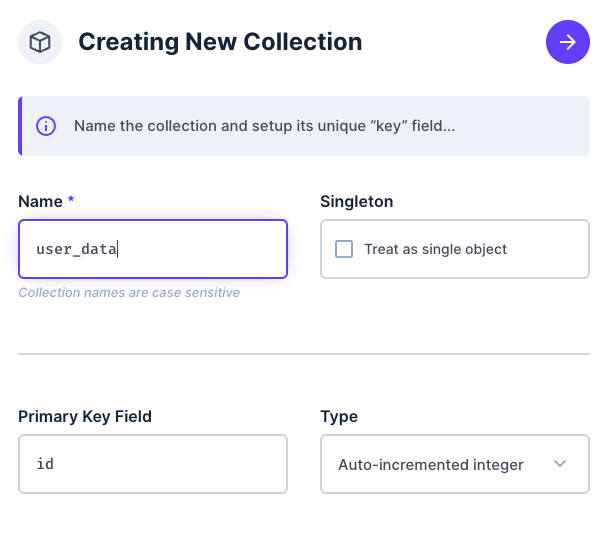
Add the following fields to the "user_data" collection and save:
- full_name (Type: String, Interface: Input): To capture the user's full name.
- email_address (Type: String, Interface: Input): To store the user's email address.
- phone_number (Type: String, Interface: Input): To store the user's phone number.
- country (Type: String, Interface: Input): Implement a field to record the user's country.
- about_you (Type: Text, Interface: Textarea): To collect additional information from users, such as their interests or feedback.
Enabling Public Access for the Collection
To enable open access to the data stored within this collection, we need to give it public access. Head over to Settings > Access Control
Navigate to the public role and then toggle Create permission from “No Access” to “All Access”.

This setting ensures that the data stored in the collection is easily accessed without authentication.
Now that the collection is in place, it's time to proceed with building the frontend of our application using Next.js.
Creating the Next.js Application
Install Next.js by running this command:
npx create-next-app@latest form-email-appnpx create-next-app@latest form-email-appOnce the installation is complete, proceed to the newly created directory:
cd form-email-appcd form-email-appProceed to install dependencies and run the scaffolded Next.js application with the command:
npm run devnpm run devNow, open http://localhost:3000/ on your browser, and you should see the Next.js starter page
This project uses the Next.js App directory.
Back in the code editor, enable Server Actions in Next.js, by updating the next.config file.
const nextConfig = {
  experimental: {
    serverActions: true,
  },
};
const nextConfig = {
experimental: {
serverActions: true,
},
};Building the form component to capture user data
Go over to the page.js file. We’ll do some cleanup here.
First, remove the placeholder code and create a form component with the following fields:
- Full Name
- Email Address
- Phone Number
- Country
- About You
Your code should look like this:
export default function Home() {
  // handleSubmit function to be here

return (
    <main>
      <form action={handleSubmit}>
        <h1>User Data Form</h1>
        <p>Please fill in your details below</p>
        <div className='form-flex'>
          <label htmlFor='name'>Full Name</label>
          <input id='name' name='full_name' required />
        </div>
        <div className='form-flex'>
          <label htmlFor='email'>Email Address</label>
          <input type='email' name='email_address' id='email' required />
        </div>
        <div className='form-flex'>
          <label htmlFor='phone'>Phone Number</label>
          <input type='tel' name='phone_number' id='phone' required />
        </div>
        <div className='form-flex'>
          <label htmlFor='country'>Choose your Country</label>
          <select name='country' id='country' required>
            <option value='kenya'>Kenya</option>
            <option value='usa'>United States</option>
            <option value='germany'>Germany</option>
            <option value='uae'>United Arab Emirates</option>
          </select>
        </div>
        <div className='form-flex'>
          <label htmlFor='aboutyou'>About You</label>
          <textarea
            id='aboutyou'
            name='about_you'
            rows='4'
            cols='50'
            required
            placeholder='Enter information about yourself...'
          />
        </div>
        <button type='submit'>Submit</button>
      </form>
    </main>
  );
}
export default function Home() {
// handleSubmit function to be here
return (
<main>
<form action={handleSubmit}>
<h1>User Data Form</h1>
<p>Please fill in your details below</p>
<div className='form-flex'>
<label htmlFor='name'>Full Name</label>
<input id='name' name='full_name' required />
</div>
<div className='form-flex'>
<label htmlFor='email'>Email Address</label>
<input type='email' name='email_address' id='email' required />
</div>
<div className='form-flex'>
<label htmlFor='phone'>Phone Number</label>
<input type='tel' name='phone_number' id='phone' required />
</div>
<div className='form-flex'>
<label htmlFor='country'>Choose your Country</label>
<select name='country' id='country' required>
<option value='kenya'>Kenya</option>
<option value='usa'>United States</option>
<option value='germany'>Germany</option>
<option value='uae'>United Arab Emirates</option>
</select>
</div>
<div className='form-flex'>
<label htmlFor='aboutyou'>About You</label>
<textarea
id='aboutyou'
name='about_you'
rows='4'
cols='50'
required
placeholder='Enter information about yourself...'
/>
</div>
<button type='submit'>Submit</button>
</form>
</main>
);
}Toggle open to reference the global CSS styles
:root {
--max-width: 1100px;
--border-radius: 12px;
--font-mono: ui-monospace, Menlo, Monaco, 'Cascadia Mono', 'Segoe UI Mono',
  'Roboto Mono', 'Oxygen Mono', 'Ubuntu Monospace', 'Source Code Pro',
  'Fira Mono', 'Droid Sans Mono', 'Courier New', monospace;

--foreground-rgb: 0, 0, 0;
--background-start-rgb: 214, 219, 220;
--background-end-rgb: 255, 255, 255;

--primary-glow: conic-gradient(
  from 180deg at 50% 50%,
  #16abff33 0deg,
  #0885ff33 55deg,
  #54d6ff33 120deg,
  #0071ff33 160deg,
  transparent 360deg
);
--secondary-glow: radial-gradient(
  rgba(255, 255, 255, 1),
  rgba(255, 255, 255, 0)
);

--tile-start-rgb: 239, 245, 249;
--tile-end-rgb: 228, 232, 233;
--tile-border: conic-gradient(
  #00000080,
  #00000040,
  #00000030,
  #00000020,
  #00000010,
  #00000010,
  #00000080
);

--callout-rgb: 238, 240, 241;
--callout-border-rgb: 172, 175, 176;
--card-rgb: 180, 185, 188;
--card-border-rgb: 131, 134, 135;
}

@media (prefers-color-scheme: dark) {
:root {
  --foreground-rgb: 255, 255, 255;
  --background-start-rgb: 0, 0, 0;
  --background-end-rgb: 0, 0, 0;

  --primary-glow: radial-gradient(rgba(1, 65, 255, 0.4), rgba(1, 65, 255, 0));
  --secondary-glow: linear-gradient(
    to bottom right,
    rgba(1, 65, 255, 0),
    rgba(1, 65, 255, 0),
    rgba(1, 65, 255, 0.3)
  );

  --tile-start-rgb: 2, 13, 46;
  --tile-end-rgb: 2, 5, 19;
  --tile-border: conic-gradient(
    #ffffff80,
    #ffffff40,
    #ffffff30,
    #ffffff20,
    #ffffff10,
    #ffffff10,
    #ffffff80
  );

  --callout-rgb: 20, 20, 20;
  --callout-border-rgb: 108, 108, 108;
  --card-rgb: 100, 100, 100;
  --card-border-rgb: 200, 200, 200;
}
}

* {
box-sizing: border-box;
padding: 0;
margin: 0;
}

html,
body {
max-width: 100vw;
overflow-x: hidden;
}

body {
color: rgb(var(--foreground-rgb));
}

main {
margin: 60px 120px;
padding: 30px;
}

a {
color: inherit;
text-decoration: none;
}

form {
max-width: 560px;
margin: 0 auto;
padding: 30px;
background-color: rgb(248, 248, 248);
box-shadow: 0 0 10px 0 rgba(var(--foreground-rgb), 0.2);
border-radius: 12px;
}

input,
select,
textarea {
padding: 10px;
border-radius: 6px;
}

button {
margin-top: 30px;
padding: 10px 20px;
border-radius: 6px;
color: white;
width: 100%;
border: none;
cursor: pointer;
font-weight: bold;
font-size: 1rem;
background-color: black;
box-shadow: 0 0 10px 0 rgba(var(--foreground-rgb), 0.2);
}

.form-flex {
display: flex;
flex-direction: column;
gap: 20px;
margin-top: 30px;
}

@media (prefers-color-scheme: dark) {
html {
  color-scheme: dark;
}
}
:root {
--max-width: 1100px;
--border-radius: 12px;
--font-mono: ui-monospace, Menlo, Monaco, 'Cascadia Mono', 'Segoe UI Mono',
'Roboto Mono', 'Oxygen Mono', 'Ubuntu Monospace', 'Source Code Pro',
'Fira Mono', 'Droid Sans Mono', 'Courier New', monospace;
--foreground-rgb: 0, 0, 0;
--background-start-rgb: 214, 219, 220;
--background-end-rgb: 255, 255, 255;
--primary-glow: conic-gradient(
from 180deg at 50% 50%,
#16abff33 0deg,
#0885ff33 55deg,
#54d6ff33 120deg,
#0071ff33 160deg,
transparent 360deg
);
--secondary-glow: radial-gradient(
rgba(255, 255, 255, 1),
rgba(255, 255, 255, 0)
);
--tile-start-rgb: 239, 245, 249;
--tile-end-rgb: 228, 232, 233;
--tile-border: conic-gradient(
#00000080,
#00000040,
#00000030,
#00000020,
#00000010,
#00000010,
#00000080
);
--callout-rgb: 238, 240, 241;
--callout-border-rgb: 172, 175, 176;
--card-rgb: 180, 185, 188;
--card-border-rgb: 131, 134, 135;
}
@media (prefers-color-scheme: dark) {
:root {
--foreground-rgb: 255, 255, 255;
--background-start-rgb: 0, 0, 0;
--background-end-rgb: 0, 0, 0;
--primary-glow: radial-gradient(rgba(1, 65, 255, 0.4), rgba(1, 65, 255, 0));
--secondary-glow: linear-gradient(
to bottom right,
rgba(1, 65, 255, 0),
rgba(1, 65, 255, 0),
rgba(1, 65, 255, 0.3)
);
--tile-start-rgb: 2, 13, 46;
--tile-end-rgb: 2, 5, 19;
--tile-border: conic-gradient(
#ffffff80,
#ffffff40,
#ffffff30,
#ffffff20,
#ffffff10,
#ffffff10,
#ffffff80
);
--callout-rgb: 20, 20, 20;
--callout-border-rgb: 108, 108, 108;
--card-rgb: 100, 100, 100;
--card-border-rgb: 200, 200, 200;
}
}
* {
box-sizing: border-box;
padding: 0;
margin: 0;
}
html,
body {
max-width: 100vw;
overflow-x: hidden;
}
body {
color: rgb(var(--foreground-rgb));
}
main {
margin: 60px 120px;
padding: 30px;
}
a {
color: inherit;
text-decoration: none;
}
form {
max-width: 560px;
margin: 0 auto;
padding: 30px;
background-color: rgb(248, 248, 248);
box-shadow: 0 0 10px 0 rgba(var(--foreground-rgb), 0.2);
border-radius: 12px;
}
input,
select,
textarea {
padding: 10px;
border-radius: 6px;
}
button {
margin-top: 30px;
padding: 10px 20px;
border-radius: 6px;
color: white;
width: 100%;
border: none;
cursor: pointer;
font-weight: bold;
font-size: 1rem;
background-color: black;
box-shadow: 0 0 10px 0 rgba(var(--foreground-rgb), 0.2);
}
.form-flex {
display: flex;
flex-direction: column;
gap: 20px;
margin-top: 30px;
}
@media (prefers-color-scheme: dark) {
html {
color-scheme: dark;
}
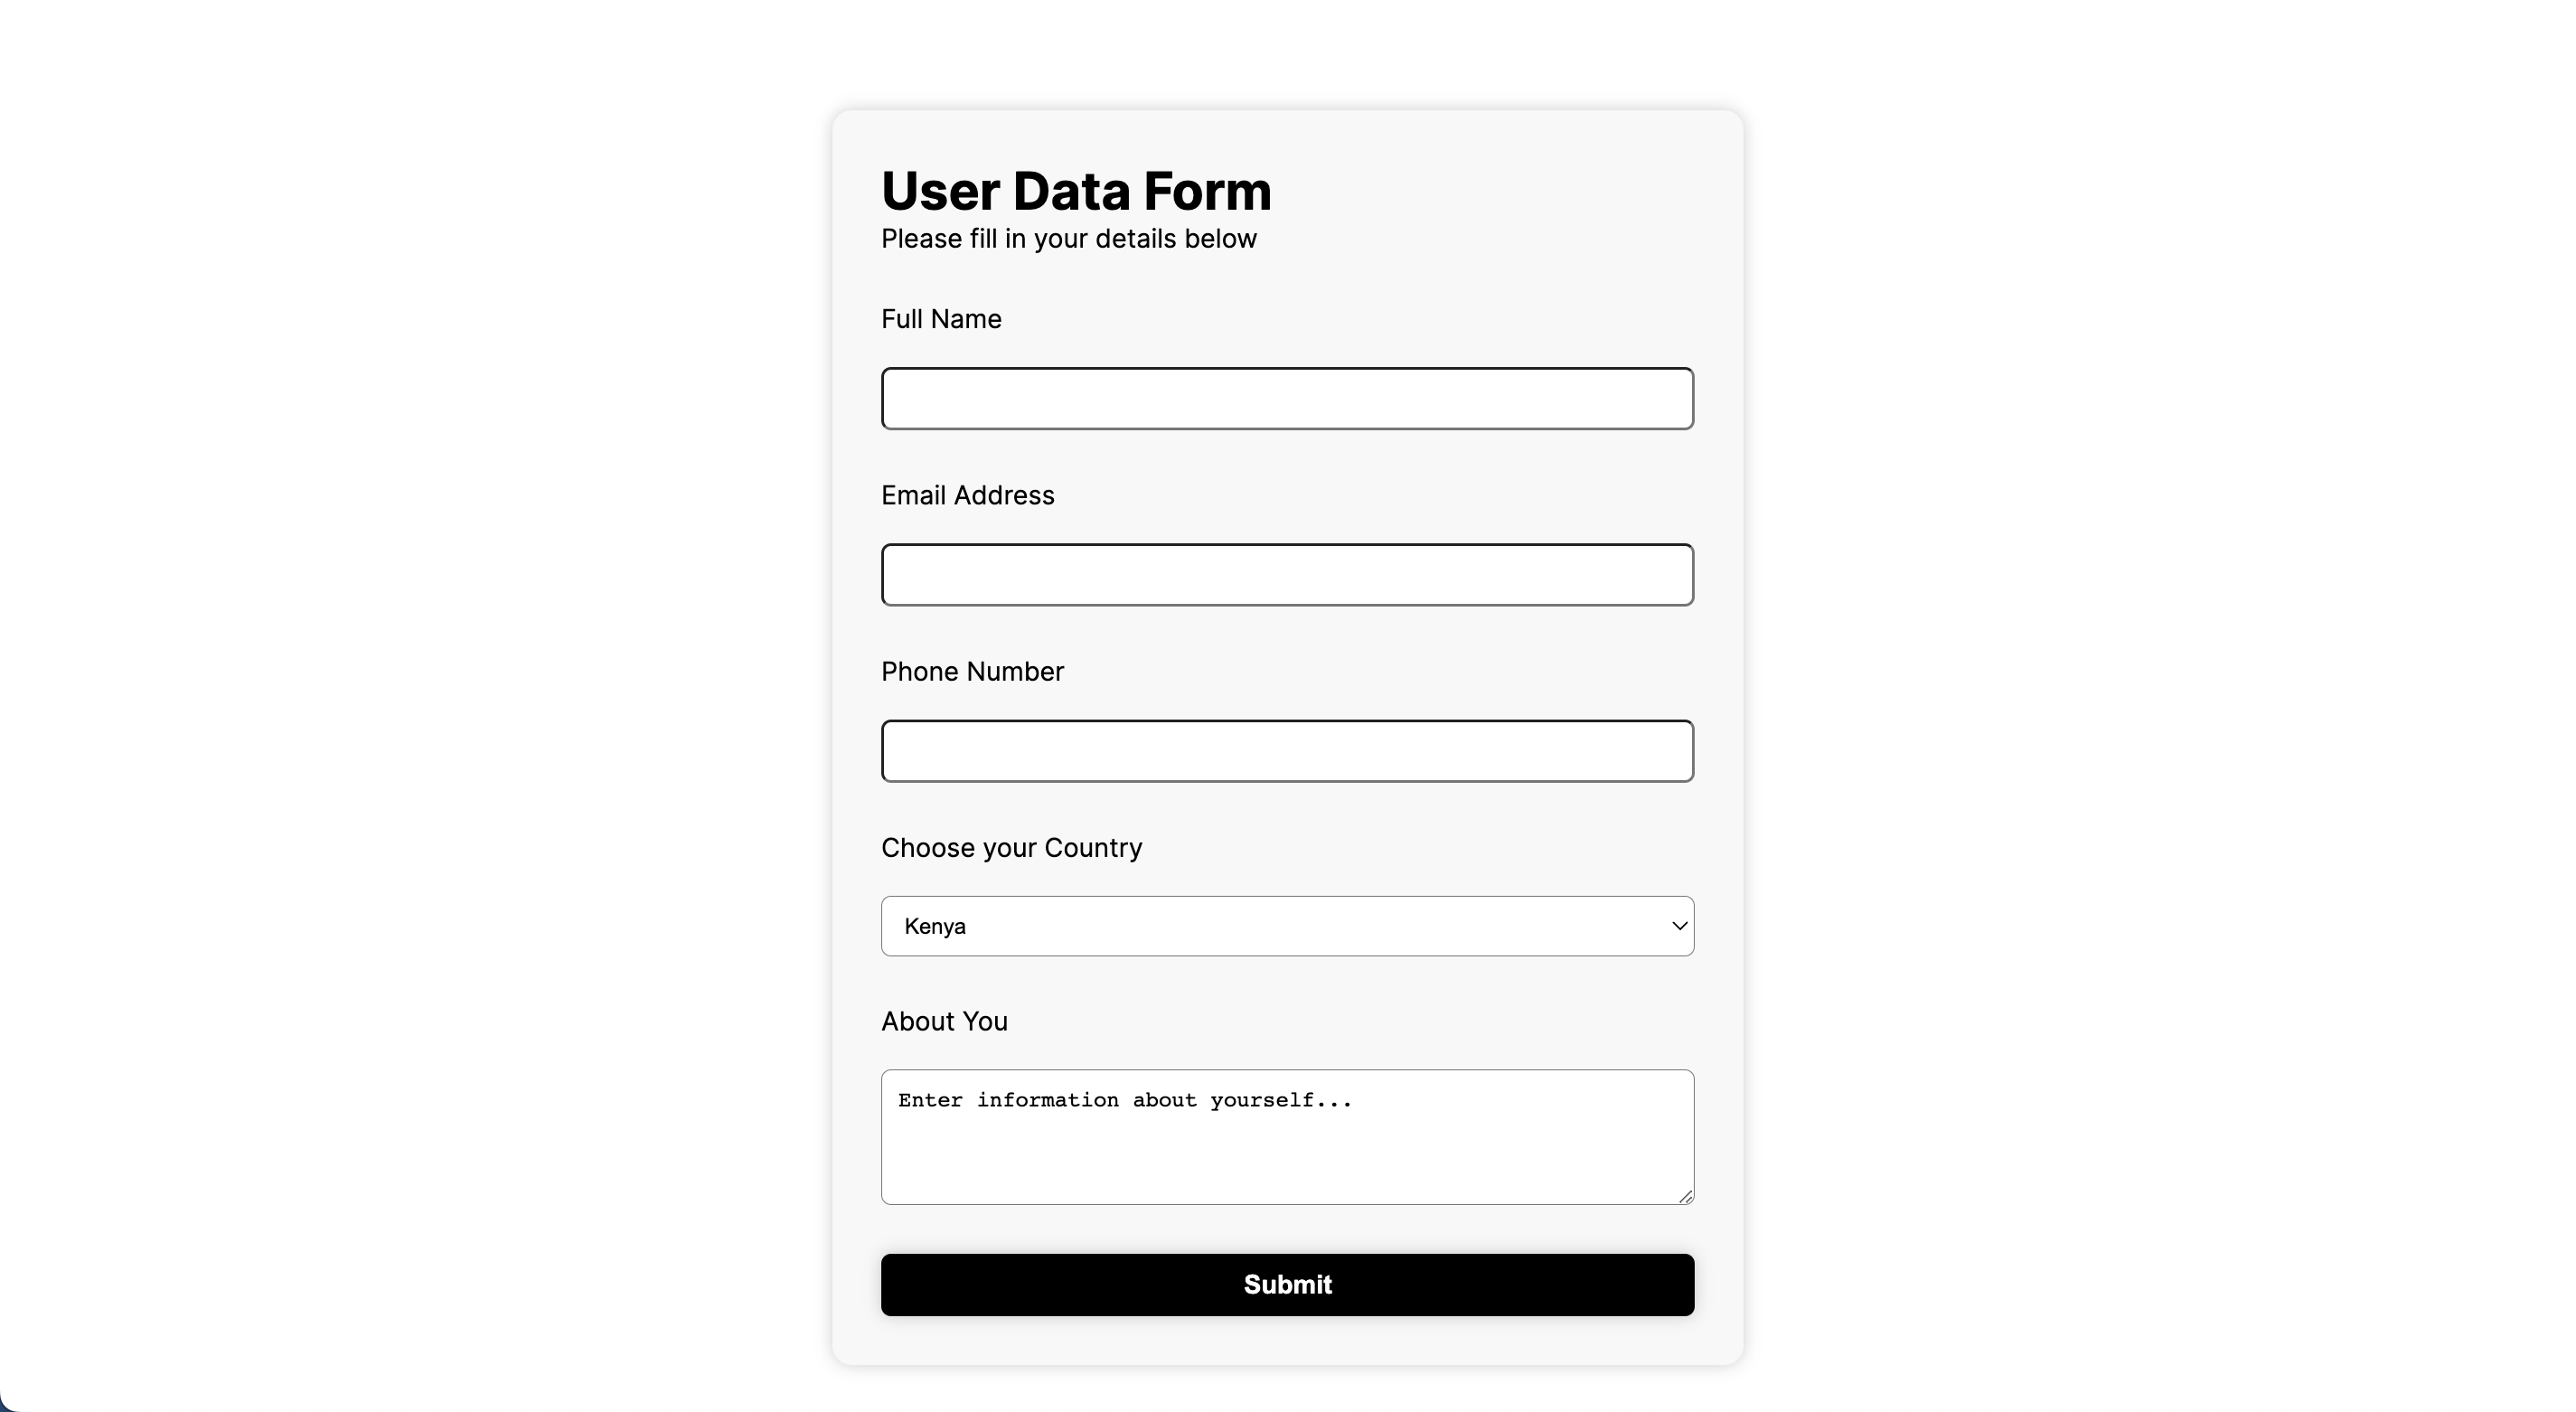
}Your form should look like this:
Integrating the Directus SDK with Next.js
Install the SDK using the command:
npm install @directus/sdknpm install @directus/sdkImport the required composables at the top of your file:
import { createDirectus, rest, createItem } from "@directus/sdk"import { createDirectus, rest, createItem } from "@directus/sdk"Now, create a composable client with REST support
const client = createDirectus('<http://directus.example.com>').with(rest());const client = createDirectus('<http://directus.example.com>').with(rest());💡 Remember to change the http://directus.example.com URL to your actual URL.
Now, we need to set up the handleSubmit function that sends data using the Directus SDK
const handleSubmit = async (formData) => {
    'use server';

    const full_name = formData.get('full_name');
    const email_address = formData.get('email_address');
    const phone_number = formData.get('phone_number');
    const country = formData.get('country');
    const about_you = formData.get('about_you');

    try {
      await client.request(
        createItem('user_data', {
          full_name,
          email_address,
          phone_number,
          country,
          about_you,
        })
      );
    } catch (error) {
      console.log(error);
    }
  };
const handleSubmit = async (formData) => {
'use server';
const full_name = formData.get('full_name');
const email_address = formData.get('email_address');
const phone_number = formData.get('phone_number');
const country = formData.get('country');
const about_you = formData.get('about_you');
try {
await client.request(
createItem('user_data', {
full_name,
email_address,
phone_number,
country,
about_you,
})
);
} catch (error) {
console.log(error);
}
};Whenever a user completes the form, the data is sent to the collection.
Configuring the Email Notification Flow
Directus Flows enable you to create automation to streamline various processes within your Directus project.
To set up a flow, go to Settings > Flows
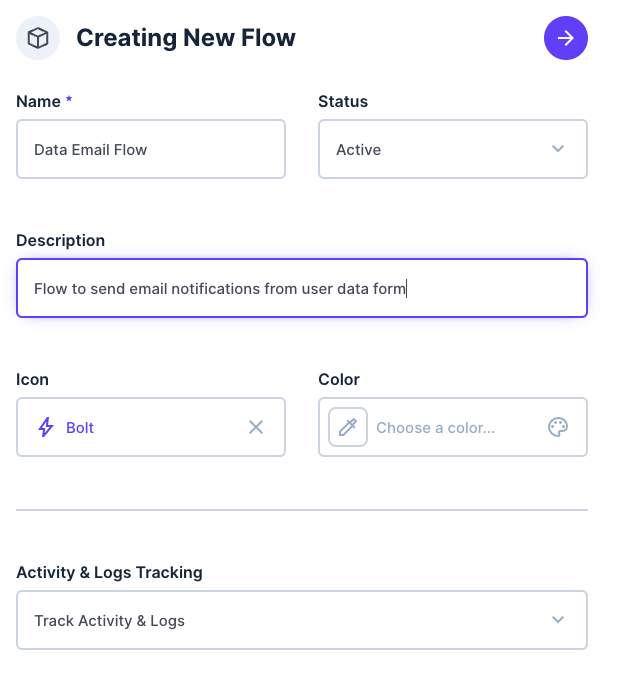
Click the + icon to create a new flow called “Data Email Flow” and add a description.
Next, we need to set up a trigger for our flow. Triggers are events that initiate a workflow.
For this flow, choose the following options:
- Trigger: Select the event hook as the trigger.
- Action: The action we'll take is non-blocking, meaning it won't cause delays in the process.
- Scope: The scope of this flow is focused on
items.create. - Collection: We'll be working with the
user_datacollection.
Adding Operations to the Flow
Operations are specific tasks to be carried out in response to the trigger event in a flow.
Add the first operation, which is to send an email notification to you as the administrator.
Edit the flow to create an operation called "Email Notification to Me"
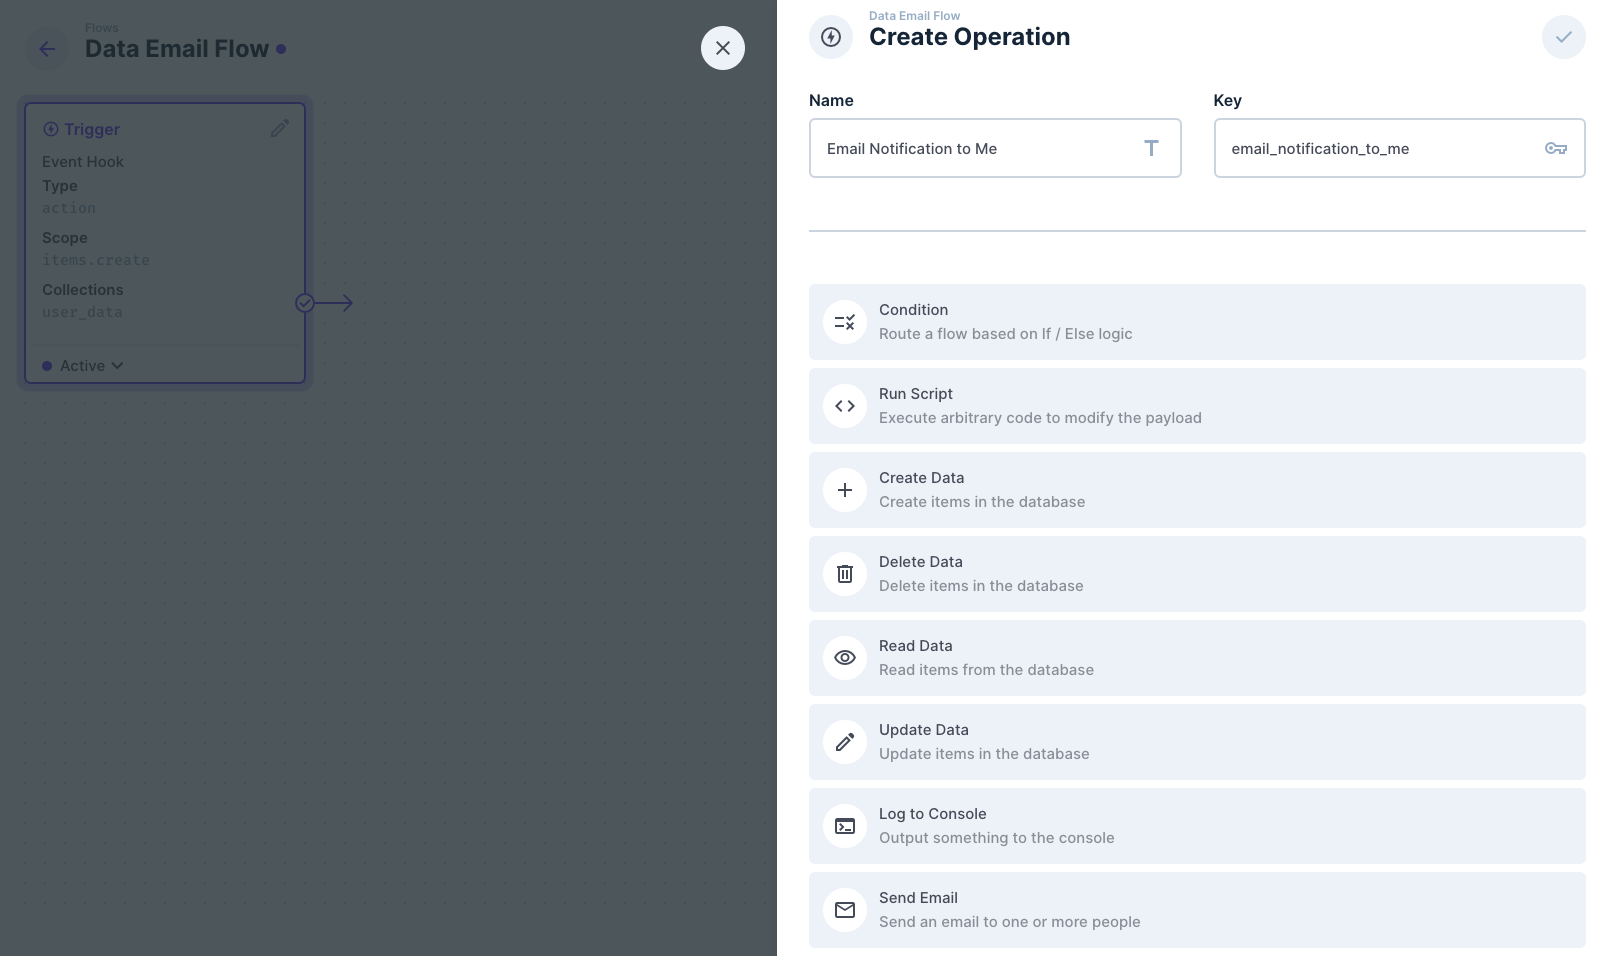
Now, select Send Email and fill in the email address the notification is to be sent to and the subject of the email.
If you are self-hosting a Directus instance, you will need to set up the email service configuration.
Keep the type of the body as Markdown but feel free to explore other types.
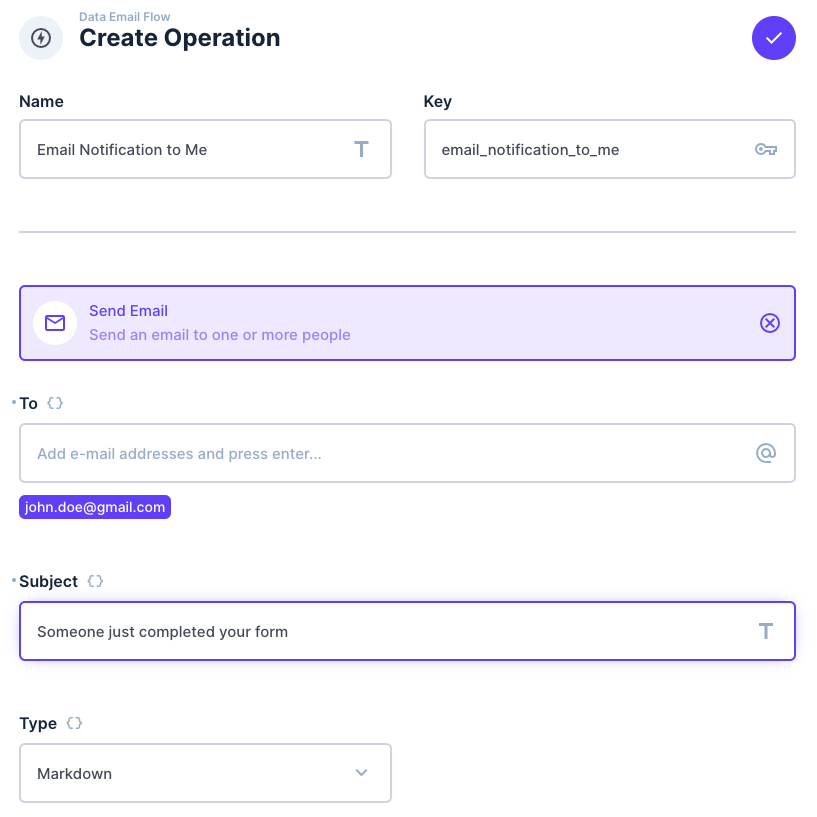
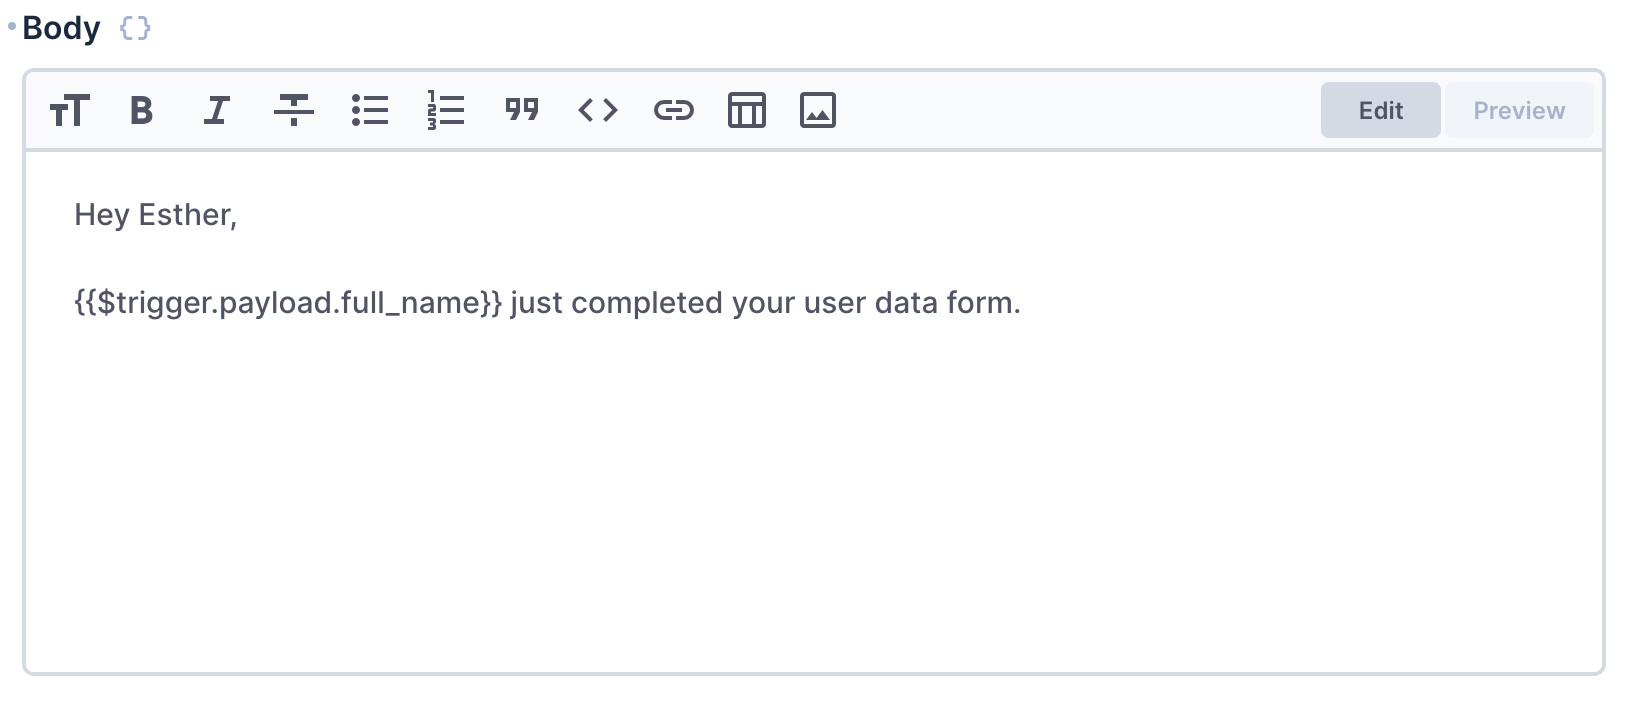
Since you have the email of the user, you can customize the email body with the name of the user with {{$trigger.payload.full_name}}.
Now, save the flow.
Whenever your form is completed, you'll get an email notification.
That's not all! Additionally, you need to send follow-up emails to users as a gesture of appreciation for completing the form and even offer an incentive.
To achieve this, include an additional operation in our flow similar to the one above.
Setting up the operation to send emails to users
Head over to your flow and edit it.
Include an additional operation for sending an email following the previously mentioned steps. However, this time, make the receiver email dynamic, adapting its value to the information filled out by the user using {{$trigger.payload.email_address}}.
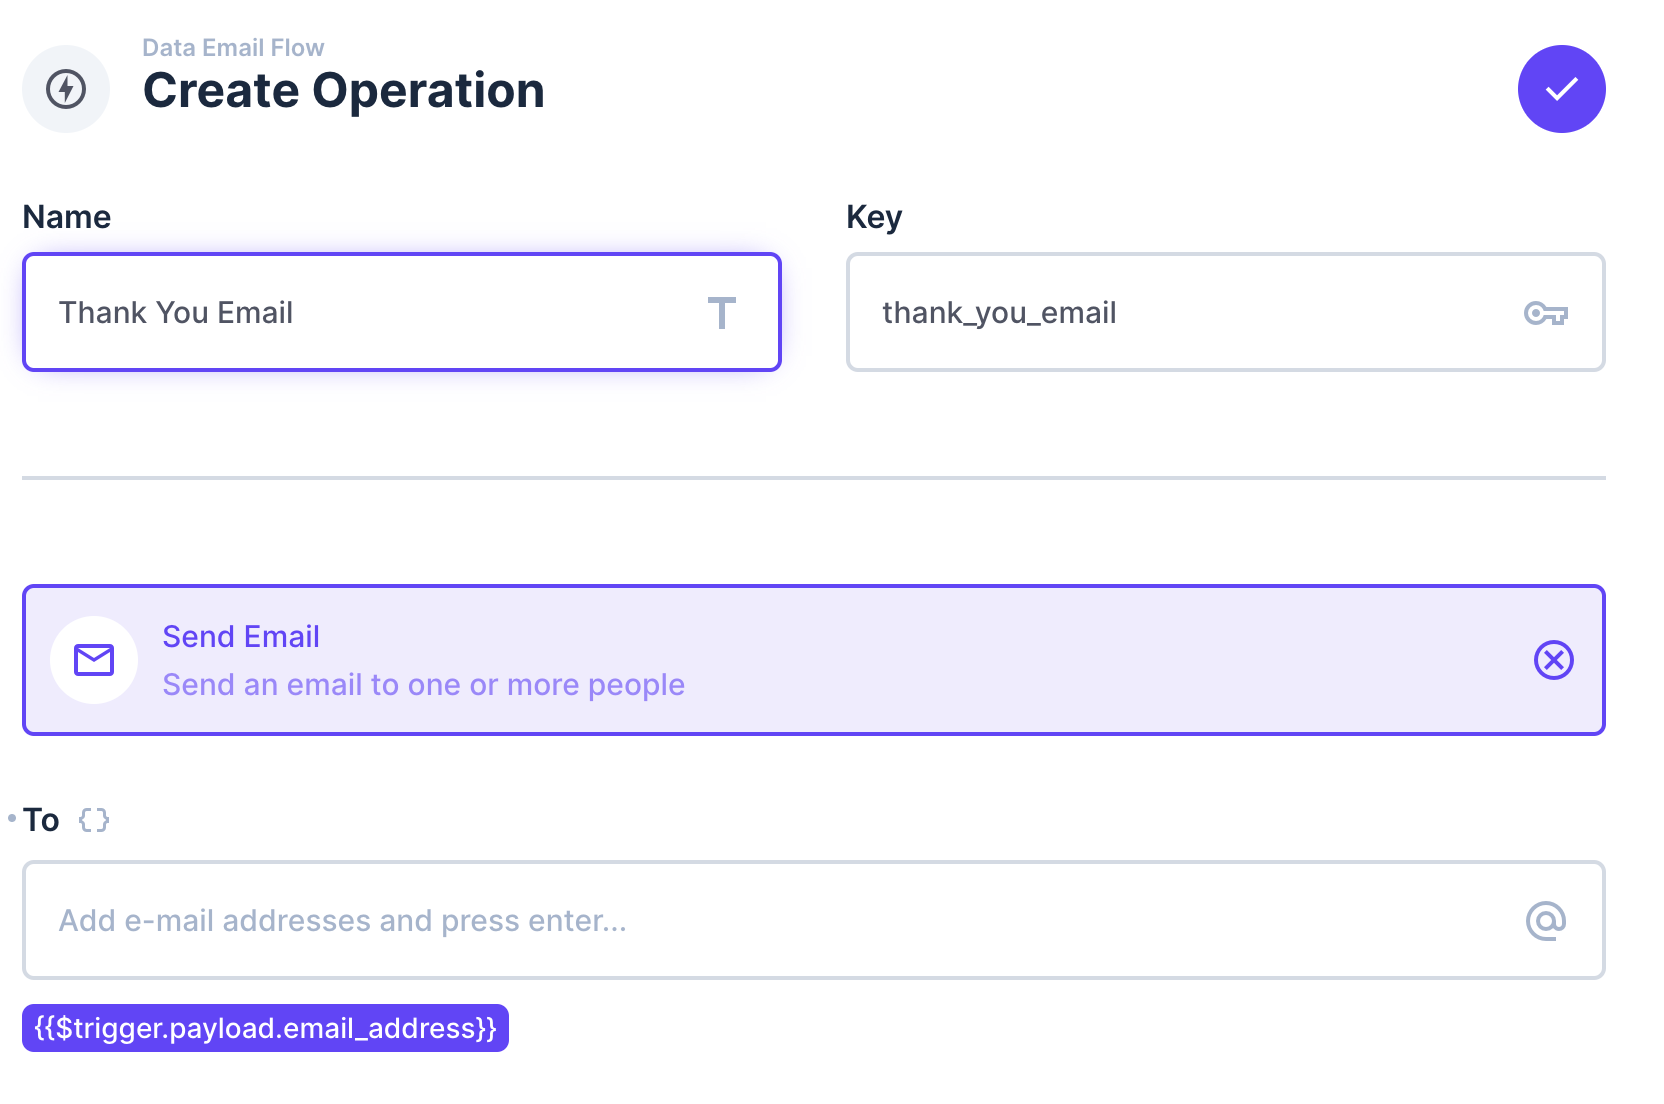
Complete the rest of the fields and save your flow.
Toggle open to see a sample email body
Hi {{$trigger.payload.full_name}},

Your feedback has been received and much appreciated.

Use this coupon code on your next checkout: "PRO11".

Till next time,

Thanks.
Hi {{$trigger.payload.full_name}},
Your feedback has been received and much appreciated.
Use this coupon code on your next checkout: "PRO11".
Till next time,
Thanks.Now go ahead and test your entire application by completing the user data form. You'll get an instant notification in your email. The user will also receive the thank you email.
Conclusion
You’ve just learnt how to set up the data collection process and implement an email notification system using Directus.
Further enhance and customize this application to suit your project needs by:
- Implementing Real-Time Updates: Add real-time to get the most up-to-date data instantly.
- Enabling User Permissions and Roles: This helps to control data access and security
- Utilizing Insights: Directus Insights allow you to visualize data and gain more knowledge from your collected data.
If you have any questions or need further assistance, please feel free to drop by our Discord server.