Use Custom Operations to Send SMS Notifications With Twilio
Operations allow you to trigger your own code in a Flow. This guide will show you how to use the Twilio Node.js helper library to send SMS messages in Flows.
Install Dependencies
To follow this guide, you will need a Twilio API Key.
Open a console to your preferred working directory and initialize a new extension, which will create the boilerplate code for your operation.
npx create-directus-extension@latestnpx create-directus-extension@latestA list of options will appear (choose operation), and type a name for your extension (for example, directus-operation-twilio-sms). For this guide, select JavaScript.
Now the boilerplate has been created, install the Twilio library, and then open the directory in your code editor.
cd directus-operation-twilio-sms
npm install twilio
cd directus-operation-twilio-sms
npm install twilioBuild the Operation UI
Operations have 2 parts - the api.js file that performs logic, and the app.js file that describes the front-end UI for the operation.
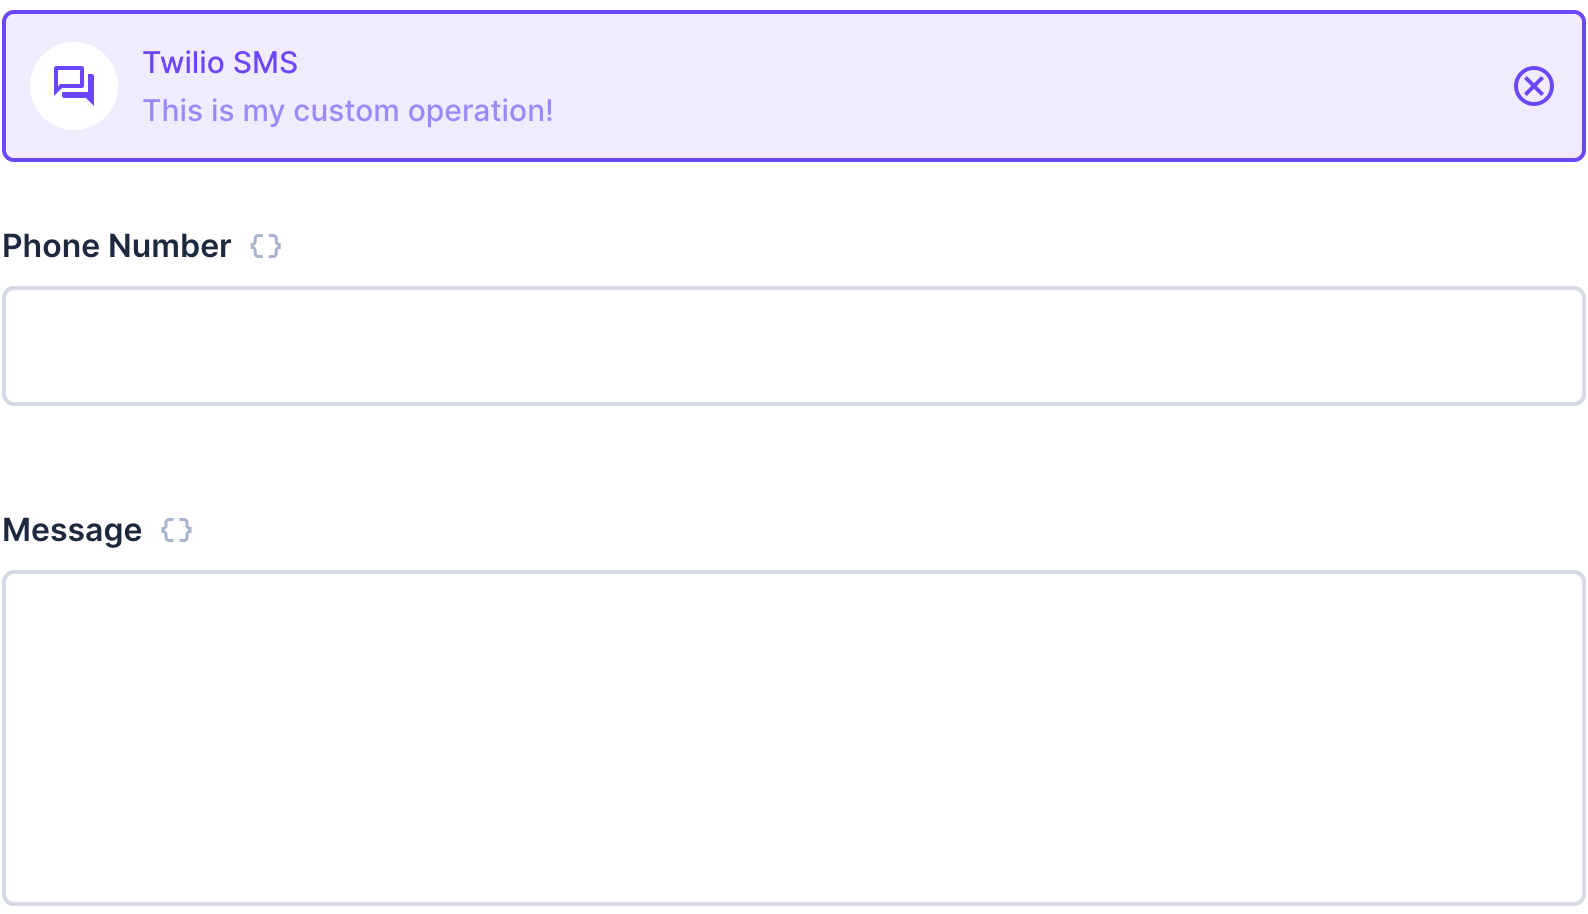
Open app.js and change the id, name, icon, and description.
id: 'operation-twilio-sms',
name: 'Twilio SMS',
icon: 'forum',
description: 'Send SMS using the Twilio API.',id: 'operation-twilio-sms',
name: 'Twilio SMS',
icon: 'forum',
description: 'Send SMS using the Twilio API.',Make sure the id is unique between all extensions including ones created by 3rd parties - a good practice is to include a professional prefix. You can choose an icon from the library here.
With the information above, the operation will appear in the list like this:

options are the fields presented in the frontend when adding this operation to the Flow. To send an SMS, you will need the phone number and a message. Replace the placeholder options with the following:
options: [
{
field: 'phone_number',
name: 'Phone Number',
type: 'string',
meta: {
width: 'half',
interface: 'input',
},
},
{
field: 'message',
name: 'Message',
type: 'text',
meta: {
width: 'full',
interface: 'input-multiline',
},
},
],options: [
{
field: 'phone_number',
name: 'Phone Number',
type: 'string',
meta: {
width: 'half',
interface: 'input',
},
},
{
field: 'message',
name: 'Message',
type: 'text',
meta: {
width: 'full',
interface: 'input-multiline',
},
},
],phone_numberis a standard string input to allow for international numbers that begin with a plus (+).messageuses an input-multiline field (textarea) to allow for a long message to be sent.
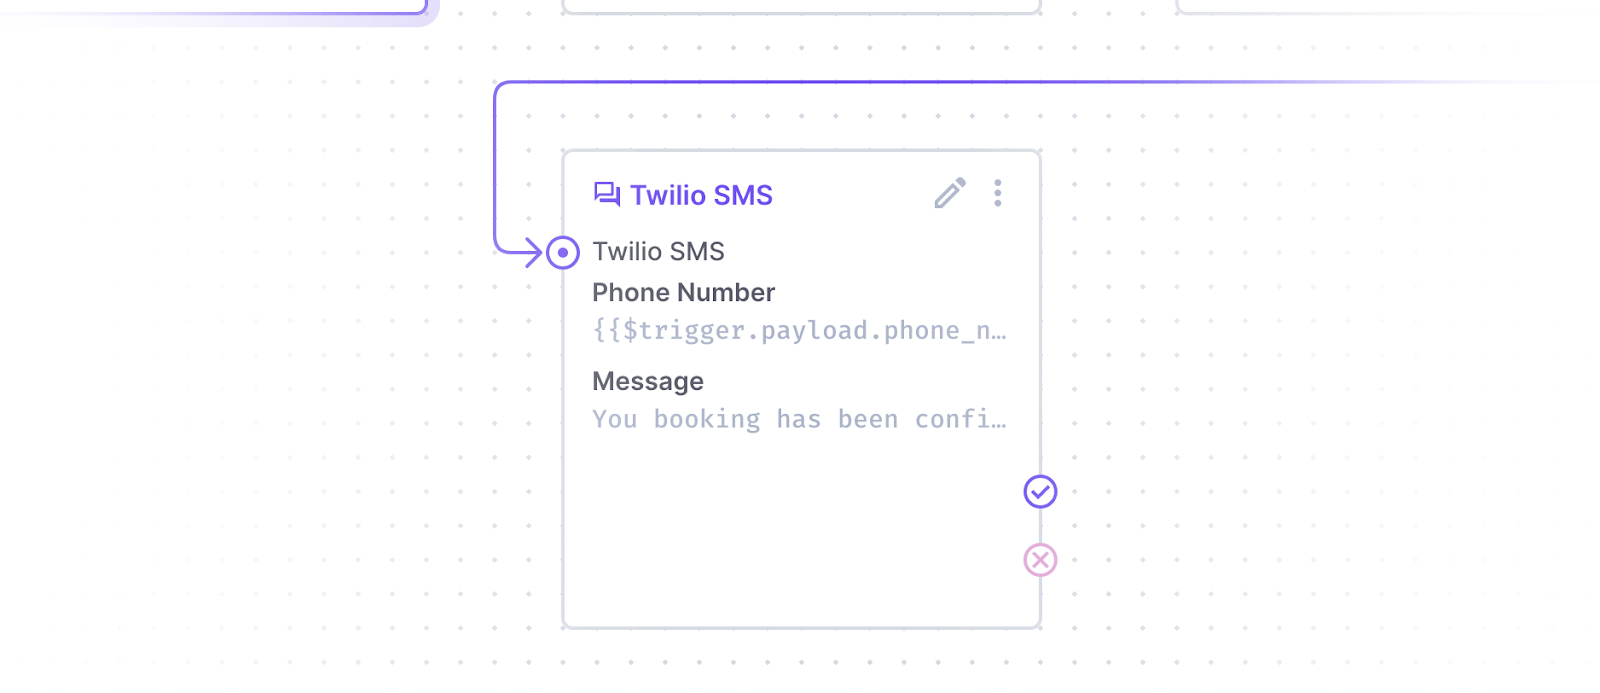
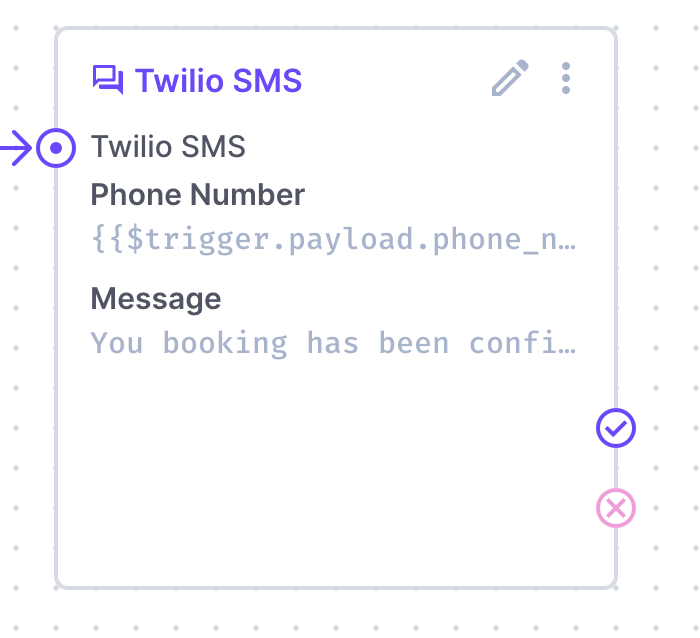
The overview section defines what is visible inside the operation’s card on the Flow canvas. An overview object contains 2 parameters, label and text. The label can be any string and does not need to match the field name. The text parameter can be a variable or just another string.
It will be useful to see both fields on the card. Replace the placeholder objects with the following:
overview: ({ phone_number, message }) => [
{
label: 'Phone Number',
text: phone_number,
},
{
label: 'Message',
text: message,
},
],overview: ({ phone_number, message }) => [
{
label: 'Phone Number',
text: phone_number,
},
{
label: 'Message',
text: message,
},
],Now, the overview of the operation looks like this:
Build the API Function
Open the api.js file, import the Twilio library and update the id to match the one used in the app.js file:
import twilio from 'twilio';
export default {
id: 'operation-twilio-sms',
handler: () => {
// ...
},
};import twilio from 'twilio';
export default {
id: 'operation-twilio-sms',
handler: () => {
// ...
},
};The handler needs to include the fields from the app.js options and the environment variables from Directus. Replace the handler definition with the following:
handler: ({ phone_number: toNumber, message }, { env }) => {handler: ({ phone_number: toNumber, message }, { env }) => {Set up the Twilio API and environment variables with the following code. These environment variables will need to be added to the project when installing this extension.
const accountSid = env.TWILIO_ACCOUNT_SID;
const authToken = env.TWILIO_AUTH_TOKEN;
const fromNumber = env.TWILIO_PHONE_NUMBER;
const client = new twilio(accountSid, authToken);const accountSid = env.TWILIO_ACCOUNT_SID;
const authToken = env.TWILIO_AUTH_TOKEN;
const fromNumber = env.TWILIO_PHONE_NUMBER;
const client = new twilio(accountSid, authToken);Use the Twilio messages endpoint and create a new message, setting the body, to, and from parameters. body will use the message variable from our handler, to will use the phone_number variable from our handler, aliased as toNumber for clarity, and from will use the fromNumber constant from the environment variable TWILIO_PHONE_NUMBER.
client.messages
.create({
body: message,
to: toNumber,
from: fromNumber,
})
.then((response) => {
return response;
})
.catch((error) => {
return error;
});client.messages
.create({
body: message,
to: toNumber,
from: fromNumber,
})
.then((response) => {
return response;
})
.catch((error) => {
return error;
});Make sure the return the response and error so they can be included in the Flow’s log.
Both files are now complete. Build the operation with the latest changes.
npm run buildnpm run buildAdd Operation to Directus
When Directus starts, it will look in the extensions directory for any subdirectory starting with directus-extension-, and attempt to load them.
To install an extension, copy the entire directory with all source code, the package.json file, and the dist directory into the Directus extensions directory. Make sure the directory with your extension has a name that starts with directus-extension. In this case, you may choose to use directus-extension-operation-twilio-sms.
Ensure the .env file has TWILIO_ACCOUNT_SID, TWILIO_AUTH_TOKEN, and TWILIO_PHONE_NUMBER variables.
Restart Directus to load the extension.
Required files
Only the package.json and dist directory are required inside of your extension directory. However, adding the source code has no negative effect.
Use the Operation
In the Directus Data Studio, open the Flows section in Settings. Create a new flow with an event trigger. Select the collection(s) to include.
If the payload does not contain the phone number, use the Read Data operation to fetch the phone number from the relevant collection. Add a new operation by clicking the tick/plus on the card, then choose Twilio SMS from the list.
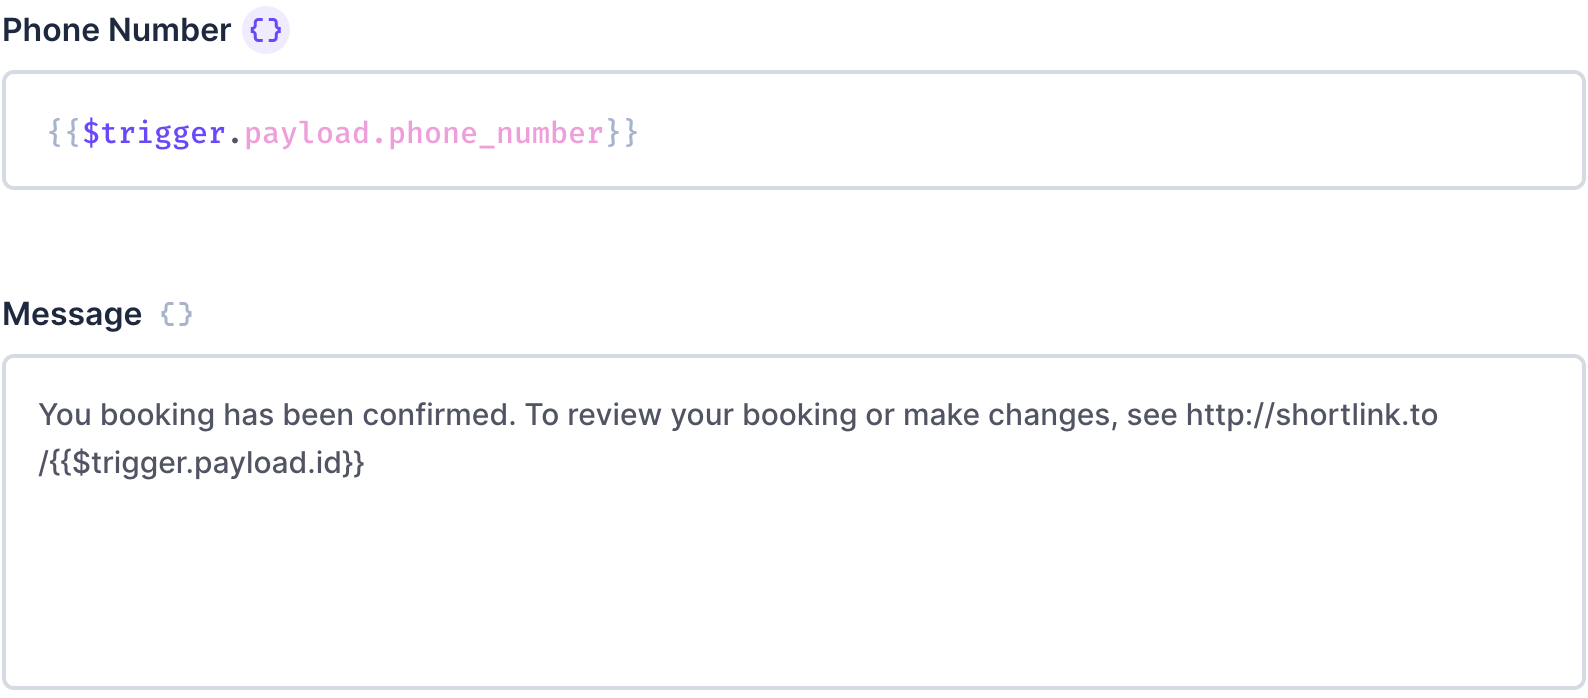
- For the Phone Number, you can use a dynamic value from a payload such as
{{$trigger.payload.phone_number}}or type a static number in the field. - For the Message, type anything that you would like to send and remember to shorten your links.
Save the operation, save the Flow, and then trigger the flow by creating a record in the chosen collection.
Summary
This operation will create a Twilio API request to send an SMS using the supplied number and message and the response is captured in the logs for reference. Now that you know how to interact with a third party API, you can investigate other services that can be used in your workflows.
Complete Code
app.js
export default {
id: 'operation-twilio-sms',
name: 'Twilio SMS',
icon: 'forum',
description: 'Send SMS using the Twilio API.',
overview: ({ phone_number, message }) => [
	{
		label: 'Phone Number',
		text: phone_number,
	},
	{
		label: 'Message',
		text: message,
	},
],
options: [
{
field: 'phone_number',
name: 'Phone Number',
type: 'string',
meta: {
width: 'full',
interface: 'input',
},
},
{
field: 'message',
name: 'Message',
type: 'text',
meta: {
width: 'full',
interface: 'input-multiline',
},
},
],
};export default {
id: 'operation-twilio-sms',
name: 'Twilio SMS',
icon: 'forum',
description: 'Send SMS using the Twilio API.',
overview: ({ phone_number, message }) => [
	{
		label: 'Phone Number',
		text: phone_number,
	},
	{
		label: 'Message',
		text: message,
	},
],
options: [
{
field: 'phone_number',
name: 'Phone Number',
type: 'string',
meta: {
width: 'full',
interface: 'input',
},
},
{
field: 'message',
name: 'Message',
type: 'text',
meta: {
width: 'full',
interface: 'input-multiline',
},
},
],
};api.js
import twilio from 'twilio';
export default {
id: 'operation-twilio-sms',
handler: ({ phone_number: toNumber, message }, { env }) => {
const accountSid = env.TWILIO_ACCOUNT_SID;
const authToken = env.TWILIO_AUTH_TOKEN;
const fromNumber = env.TWILIO_PHONE_NUMBER;
const client = new twilio(accountSid, authToken);
client.messages
.create({
body: message,
to: toNumber,
from: fromNumber,
})
.then((response) => {
return response;
})
.catch((error) => {
return error;
});
},
};import twilio from 'twilio';
export default {
id: 'operation-twilio-sms',
handler: ({ phone_number: toNumber, message }, { env }) => {
const accountSid = env.TWILIO_ACCOUNT_SID;
const authToken = env.TWILIO_AUTH_TOKEN;
const fromNumber = env.TWILIO_PHONE_NUMBER;
const client = new twilio(accountSid, authToken);
client.messages
	.create({
		body: message,
		to: toNumber,
		from: fromNumber,
	})
	.then((response) => {
		return response;
	})
	.catch((error) => {
		return error;
	});
},
};